


Seven-Step Guide to Improving Building Perimeter Security
Introduction
The recommendations in this guide are intended to inform and help you enhance the physical security of your house of worship, community center or school against the threat of forced entry or bomb blast initiated as part of a terrorist attack on your facility. The “Secure House” program is offered to support and not to replace your professional Threat, Vulnerability and Risk Assessment (TVRA”), which you will need to apply for the U.S. Department of Homeland Security (“DHS”) and Federal Emergency Management Agency (“FEMA”) administered Non-Profit Security Grant Program (“NSGP).
Specifically, this outline should show you how to critically look at and evaluate the key physical features and day-to-day uses of your facility so that you anticipate and can contribute to the TVRA process.
Importantly, the steps outlined below should be valuable long after your TVRA is completed, as they are part of a dynamic ongoing process of monitoring conditions and adjusting security protocol and facility policies for seasonal and permanent changes in environmental conditions, structural features, security practices and procedures, and use of your facility.
“SECURE HOUSE”– PREPARING FOR YOUR THREAT, VULNERABILITY & RISK ASSESSMENT (“TVRA”)
This section of SECURE HOUSE is devoted to preparing you to obtain your TVRA, in support of your application for a grant (“Grant”) from the U.S. Department of Homeland Security (“DHS”) Federal Emergency Management Agency (“FEMA”) administered Non-Profit Security Grant Program (“NSGP”).
To make the most out of your TVRA, we hope to help you look at your house of worship, community center or school in a way that enables you to understand what considerations go into judging your vulnerability to the threat of terrorism, crime and other hazards. Please understand that this guide is intended only to assist you in your Grant application and is not a substitute for a professionally conducted TVRA, required for the NSGP.
The following is intended to provide you with a baseline understanding of the threat assessment process, as you proceed from grant application to project completion. It is hoped that this will help you contribute to your TVRA, complete your grant application and protect your facility.
Download a PDF version of this guide by filling out this form, or keep scrolling to read.

Chapters
Step 1
Getting Started–Knowing Your Facility and Operations
Step One –Getting Started–Knowing Your Facility and Operations
Protecting your house of worship, community center or school against terrorism, crime and other hazards does not require that you be an engineer or security expert. However, since you and your staff know your facility, you should put your team’s day-to-day knowledge to work, developing a facility abstract, including the following:
1. A property map showing:
a. Perimeter (property) boundaries and distances from the perimeter to
your facility;
b. Comparative elevations and locations of driveways, parking, walkways, natural
barriers (forest, significant rock and water features and hedges) and man made barriers (fences&bollards); and;
c. Locations of exterior lighting;
2. Locations of exterior lighting;
a. Perimeter entry and exit locations, including garage and freight/service entries;
and
b. Interior stairways, elevators, classrooms, offices, public areas, emergency
evacuation routes and designated “shelter-in-place” locations;
3. A schedule describing and classifying ground floor perimeter doors, glass sidelights and window glass, indicating operable or fixed, glass type (plate, tempered, laminated), structural frame type (metal, wood, other);
4. A schedule of interior locked rooms and (for each) description of door (solid or with vision panels and/or sidelights) and wall vision panels;
5. A schedule of security cameras and access-control and monitoring systems; and emergency preparedness and evacuation plans;
6. A calendared schedule of your facility’s activities, by area, e.g., administrative offices, classrooms, social activity rooms, fitness centers, sanctuaries, cafeteria, etc.;
7. A roster of the full and part-time staff, noting contact information for “responsible” persons; and
8. Plans for day-to-day activities and emergency operational and evacuation procedures, integrating information about “safe” area locations,and guidance you’ve received from law enforcement and fire authorities to allow safe emergency access for first responders.
With this, your TVRA professional will start your assessment with an accurate picture of your facility’s vulnerability and state of security (emergency) preparedness.
Next, by exploring the integrity and design of your facility’s envelope and interior areas, paying attention to entries,door and window construction, locks,walls and clerestory glass,your TVRA professional will be able to appreciate their limitations in resisting violent forced entry and bomb blast, and can evaluate options for upgrading security of your facility’s perimeter and interior in order that you can proceed with your grant application, inviting budgetary pricing bids for each priority.
Step 2
Anticipating Threats, Degrees of Vulnerability and Setting Priority Zones
1. Anticipating Threats & Proposed Countermeasures
While you will rely on your TVRA professional to identify threats to your facility, you may want to consider the following threat/response vectors, so that you can anticipate what preparation you will need to provide for in your grant application(s):
1. Threat: Armed or unarmed vehicle (unauthorized entry onto facility property)
a. Threat: ramming weapon, vehicle explosive or to enter& leave rapidly
b. Countermeasure: perimeter gates, fencing, physical barriers, e.g., bollards; electronic or manned monitoring of property, motion-triggered exterior lighting.
2. Threat: Armed or unarmed pedestrian intrusion onto facility property
a. Threat: Visual intrusion–intrusive surveillance to visually target facility
occupants*
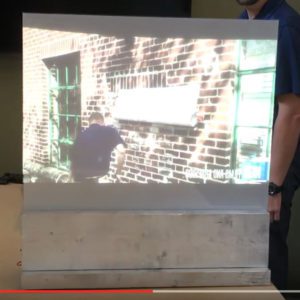
b. Countermeasure: electronic or manned monitoring of property allowing preemptive engagement of intruder; daytime privacy (highly-reflective) glazing film on interior/exterior surface of windows & glass (shades/blinds/curtains).
3. Threat: Explosive device (exterior)
a. Threat: Hand carried explosive (satchel charge, pipe bomb) hidden in nearby landscaping, trash and donation receptacles.
b. Countermeasure: cleared (electronic or manned monitored) standoff space around facility; hardening perimeter doors/windows/curtain wall glass with structurally-attached security glazing film to existing glass; affix acrylic barrier panels to exterior; or replacement of glass with laminated glass, motion-triggered exterior lighting.
4. Threat: Forced entry through door glazing, sidelights, windows and curtain wall glass
a. Threat: Combined firearm and hand carried melee weapon (bat, tire iron, etc.)
b. Countermeasure: Locked entry doors, locked (operable) windows, glass-break detectors (central station& alarmed), hardening perimeter door/window/curtain wall glass with structurally-attached security glazing film; acrylic barrier panels on interior/exterior frames; replacement of glass with laminated glass; replacement of glass&frames with UL-certified B/R framed system.
5. Threat: Forced entry through interior room doors (with vision panel glass & sidelights)
a. Threat: Combined firearm and hand carried melee weapon (bat, tire iron, etc.)
b. Countermeasure: Easily locked metal or solid-core entry doors, harden door vision panels and sidelights with (i) structurally-attached security window film (attachment method must be compatible with door framing material, e.g., wood) or (ii) interior (structurally-attached) acrylic barrier panels.
*Note that means of addressing (unwanted) surveillance by remote unmanned flying drone vehicles should be discussed with TVRA professionals.
2. Degrees of Vulnerability
Your objective is to logically apply available resources to create layered levels of security, designed to identify, deter, delay and mitigate the effects of an attack on your facility.
The following will propose that you consider identifying priority zones–perimeter locations, based on relative vulnerability to threat so that you can allocate resources as needed. Consider these factors:
a. Proximity of facility entry points to property boundary;
b. Ease of penetration and entry through door/window glass, flimsy framing; and
c. Locations of prospective (target) occupants within the facility.
3. Setting Priority Zones
a. Entries to the facility.
b. Metal-framed glass entry doors and adjacent sidelights or windows
c. Emergency (push bar exit) doors with glass vision panels
d. Large operable ground floor windows (at ground level -easy access)*
e. Large fixed ground floor curtain wall glass (at ground level to allow easy access).
4. Mission
It is important to remember that your mission is to detect, deter and delay threats.
Your most effective policy may be to create the broadest affordable baseline of protection across the ground level perimeter of the facility. In applying for future grants, you can enhance and strengthen the security at key priority locations as funding permits.
*Note that ground floor windows and entries which are out of direct line-of-sight of public road offer enhanced privacy, allowing intruder more time to penetrate and enter.
Step 3
Evaluating Security Solutions–Structures, Applications & Performance Standards
- Your TVRA will set the stage for completing your grant application by listing your vulnerabilities and recommending solutions to address them.
- Next, prioritize and identify the security measures you want to apply to mitigate your vulnerabilities.
- To simplify your solicitation of security products, you should encourage your TVRA professional to direct you to a guide to (independently tested) performance standards, developed, e.g., by Underwriters’ Laboratories, to identify the performance capabilities of security products you would like to use.
- Knowing what performance-qualified security products you want, you may now invite non-binding, preliminary,discussions with vendors to better understand the anticipated cost of their furnishing and installing each security measure. This will enable you to better allocate resources to mitigate the vulnerabilities identified in the TVRA.
- Special attention should be given to discussing with your TVRA professional, the following:
- Time/event-sensitive vulnerability (operations during high-occupancy periodic/special events, holidays) … when and how frequently are you most at risk in each location?
- Use/facility-location sensitive vulnerability. Where, within your facility are you most at risk? Identify facility locations by use (type) and occupancy density. i.e., offices, classrooms, playground, fitness centers, sanctuaries.
- Establish response timeline for first responders –this will dictate how to defend against threat based on anticipated entry into facility by first responders.
- Discuss (and plan for) adequacy and location of one or more “Safe” room(s), emergency evacuation plans.
Step 4
What to Expect from your TVRA
You should expect that your TVRA will be based on a comprehensive survey of Solutions Vendors your facility and its operations. Providing you with the following:
a. A definition of your risk environment through information culled from intelligence sources and documented trending of emerging threats. This will allow identification of potential (and likely) threats, enabling you to evaluate your facility structure, technical security (surveillance and other) systems and daily/emergency operations,and improve and prioritize security based on a sensible application of resources.
Note #1: Evaluation of risk is based on the likelihood and severity of the threat. It is important to remember that this process is not designed to eliminate all risks, but rather to identify, manage and mitigate the most acute and common risks within the limits of operational, functional and resource capacity.
Step 5
What you Should Expect from your Security Solutions Vendors
a. Detailed explanation of the proposed systems how they operated.
b. Detailed explanation of the installation process, separating cost by materials and labor.
c. Detailed explanation of the operational and aesthetic standards by which the products are judged to be properly installed and operating.
d. Detailed explanation of the manufacturer’s and dealer’s warranties (materials and labor)
e. Detailed explanation of the independently tested, industry-accepted, performance standards established to allow you to determine the effectiveness of the product.
f. Reference list of testing results
g. Reference list of engineers and/or construction and security experts who are knowledgeable about the product and can be available to explain the application being proposed.
h. Reference list of at least three clients for whom the work, similar in type and magnitude as proposed, was completed in the last three (3) years, including names, phone numbers, email addresses.
i. Samples and/or cut sheets of component materials proposed to be installed
Safety Assistance with Trusted Design Solutions
The safety of houses of worship, community centers, schools and neighborhood should never be taken for granted. Importantly, peace of mind and guidance are available through the resources and security assistance of National Glazing Solutions (NGS).
With over 30 years of combined in-the-field experience with law enforcement and engineers, NGS can provide a needs-driven mix of solutions helping Executive Directors make informed decisions regarding community safety. Working with all communities, NGS stand ready to ensure that test-proven,correct security solutions are available to provide comfort, safety and wellbeing for everyone.
Step 6
Overview -Anticipating Threats & What You Need To Meet Them
Now that your TVRA professional has identified the nature and likelihood of threats to your facility, you can set priorities and plan what you will need to secure your facility.
1. Threat: Armed or unarmed vehicle (unauthorized entry onto facility property)
a. Threat: ramming weapon to penetrate facility perimeter, vehicle explosive to deliver and detonate blast nearby facility perimeter;or vehicle to enter & leave rapidly
b. Countermeasure: locked perimeter gates/fencing, physical barriers, e.g., ditch/ berm, bollards; large closely spaced ornamental rocks; enlarged curb; electronic or manned monitoring of property(monitored drones during periods of high occupancy,and, motion-triggered exterior lighting. Note: System-wide emergency alert system.
2. Threat: Armed or unarmed pedestrian (unauthorized entry onto facility property)
a. Threat: Privacy (visual) intrusion–intrusive surveillance to target facility occupants*
b. Countermeasure: electronic (fixed or aerial) or manned monitoring of property allowing preemptive engagement of intruder; daytime-privacy (highly reflective) solar/security glazing film on interior/exterior surface of windows & glass (shades/blinds/curtains).
3. Threat: Explosive device (exterior)
a. Threat: Hand carried explosive (satchel charge, pipe bomb) hidden in perimeter landscaping, trash and donation receptacles. Explosive blast weaponizing perimeter glass, causing injury.
b. Countermeasure: Remove plantings from facility perimeter to allow open “standoff” space; and replace or reinforce perimeter doors, door glazing, sidelight glazing, operational and curtain wall windows, using structurally reinforced and/or attached laminated glass, acrylic/polycarbonate, panels and security glazing film.
Note! All components must be “performance” rated by UL, HP White or other accredited source.
4. Threat: Forced entry through doors, door glass, sidelights, windows and curtain wall glass
a. Threat: Combined firearm and hand carried melee weapon (bat, tire iron, etc.)
b. Countermeasure: Locked (to frame) entry doors,replace exterior door hinges with interior or hidden door hinges, locked (operable) windows, glass-break detectors (central station & alarmed), replaced or reinforced perimeter door (vision) glass, operable (ground floor) windows, curtain wall glass… with structurally attached security (laminated) glass, security glazing film; acrylic barrier panels on interior/ exterior frames. Note. Where securing metal framed glass doors, note that security glazing film must be attached to structural portion of the door frame and NOT solely to the removable “L” shaped perimeter metal clips that hold the door glass within the door frame.
5. Threat: Forced entry through interior room doors (with vision panel glass & sidelights)
a. Threat: Combined firearm and hand carried melee weapon (bat, tire iron, etc.)
b. Countermeasure: Install easily operated (interior-locked) metal or solid-core entry doors;replace or reinforce door vision panels and sidelights with (i) laminated glass, security acrylic panels or structurally attached security window film. Note, all vision panel options must be structurally anchored to all four perimeter edges, where the vision panel meets the door.
* While maintaining the ability to open these operable windows, the ability to secure them against forced entry attack and blast force impact is dependent on the profile of the window frames (to accommodate the film-to-frame attachment of the interior installation of security glazing film); and the design/integrity of the (hinge) attachment points affixing the window frame to the building structure.
Step 7
Looking at your Facility - Step by Step
1. Assess feasibility & desirability of installing the following:
a. Perimeter fences and lockable gates at property line to facility;
b.Perimeter motion-actuated lighting and surveillance cameras;
c. Environmental Program:
Raised curbs
Modify driveway, preventing straight line road access to facility, ditches
Build decorative berms, install large rocks, bollards,to block vehicle attack
Install perimeter lighting, motion detectors
Create clear perimeter standoff area around facility by removing landscaping, refuse
receptacles and donation receptacles.
2. Assess ability of the structural integrity/ability of ground floor perimeter of facility (entries, windows, fixed glass) to meet your “Security Goal” (defined below):
3. Security Goal: To resist and delay forced entry by attacker (armed with firearm and hand carried melee weapon (bat, tire iron, etc.) (“Security Goal”)
Entries –doors, sidelights and transoms
Objective: Assess need to replace or fortify entry doors and/or door components (vision glass and/or door frames and/or locks and/or hinges) to meet Perimeter Security Target:
a. Can doors lock?
b. Do doors lock, automatically? Or do they require personal action?
c. Do door locks have (minimum 1” long) deadbolt?
d. Are doors equipped with propped open alarms?
e. Are door hinges hidden or exposed?
f. Are door push-bars accessible from (door) vision panels or sidelight glass?
g. How is(door)vision glass held in door frame?
h. Door vision glass–Security Evaluation
1. How are vision panes secured to door frame (note, design weakness of perimeter “L” shaped, snap on, retaining clips and putty adhesive in historic wood frames)?
2. Is existing (door) vision glass annealed, tempered, laminated or wire?
i. Door vision glass –Security Remediation-Options
1. Install UL-972 performance-rated security glazing film to the interior surface of the (door) vision glass and sidelight glazing; and secure the perimeter edges of the installed film (over “L” clips) to the door frame with a film-to-frame extruded vinyl (adhesive-attached) system. (Note: attachment only to removable “L” clips will not provide sufficient integrity to withstand forced entry impact.
2. Replace door vision and sidelight glass with laminated glass (with nominal thickness.060 interlayer of Polyvinyl Butyral (“PVB”); and install UL-972 performance-rated security glazing film to the interior surface of the laminated vision glass, securing the perimeter edges of the installed film (over “L” clips) to the door frame with a glass edge-to-frame extruded vinyl (adhesive-attached) system.
3. Reinforce and protect door vision and sidelight glass and door frames with an exterior retrofit, performance-rated, framed acrylic or polycarbonate security shield system.
4. Remove and replace entry (doors, sidelights and transom glazing) with a totally integrated (frame, hinge, lock and glass), certified ballistic, attack, and blastresistant system
Ground Level Fixed Window Glass
- Install UL-972 performance-rated security glazing film to the interior surface of the glass; and secure the perimeter edges of the installed film to the frame with a film-toframe extruded vinyl (adhesive-attached) system. (Note: Daytime visual privacy from unwanted surveillance can be achieved by specifying that the security glazing film be highly reflective).
- Reinforce and protect glass with an exterior retrofit, performance-rated, framed acrylic or polycarbonate security shield system.
- Replace window glass with laminated glass (with a nominal thickness .060 interlayer of Polyvinyl Butyral (“PVB”); and install UL 972 performance-rated security glazing film to the interior surface of the laminated vision glass, securing the perimeter edges of the installed glass to the frame with a glass edge-to-frame extruded vinyl (adhesive-attached) system.
- Remove and replace window glass and frames with a totally integrated (glass and frame), certified ballistic, attack, and blast-resistant system.
(Note: for ballistic resistance to be complete, you should consider installing B/R lining within the walls surrounding the fixed window panels).
Ground Level Operable Windows–Remaining Operable
- Install UL-972 performance-rated security glazing film to the interior surface of the glass; and secure the perimeter edges of the installed film to the frame with a film-toframe extruded vinyl (adhesive-attached) system. (Note: Daytime visual privacy from unwanted surveillance can be achieved by specifying that the security glazing film be highly reflective).
- Reinforce and protect glass with an exterior retrofit, performance-rated, framed acrylic or polycarbonate security shield system.
- Replace window glass with laminated glass (with a nominal thickness .060 interlayer of Polyvinyl Butyral (“PVB”); and install UL-972 performance-rated security glazing film to the interior surface of the laminated vision glass, securing the perimeter edges of the installed glass to theframe with a glass edge-to-frame extruded vinyl (adhesiveattached) system.
- Remove and replace window glass and frames with a totally integrated (glass and frame), certified ballistic, attack, and blast-resistant system. (Note: for ballistic resistance to be complete, you should consider installing B/R lining within the walls surrounding the window panels.
Protecting Your People and Property Starts at the Perimeter
Schedule a free building perimeter security assessment today!
Download a PDF version of this guide by filling out this form.
